Hello, friends!
I am so excited to announce that I am guest blogging and creating on the Unity Stamp Company blog each Thursday, through June! I am so humbled to have been asked to be a contributor! Join me on the USC blog <---- as we discover new techniques, revisit tried and true favorites and be challenged to create!
Today I'm here (and there) to share with you how I make decoupaged cards using decorative napkins! It’s a little messy, and a whole lotta fun! And the result is just stunning! Here are 3 cards I made with this technique.


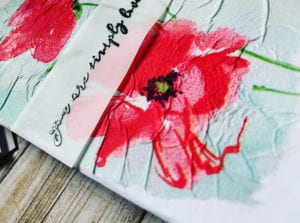
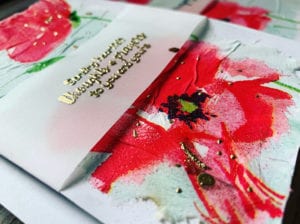
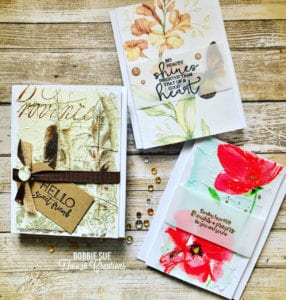
The 2 cards below are an A2 size (4 1/4 x 5 1/2) and a 3 3/4in X 9in to fit a #10 size envelope . The sentiments are heat embossed on a strip of vellum and tightly wrapped to the back of the panel secured with scotch tape. On the A2 card I heat embossed gold powder dots to give the appearance of gold splatter. I simply used my quickie glue roller pen on various areas of the card I wanted the embossing powder to adhere to and then heat set it as if I used embossing ink. Worked perfectly!
The A2 sentiment is from the June 2016 sentiment Kit Succulent Salutations. The other is from a beautiful set by Tierra Jackson called Simply Lovely Birdie.
The A2 sentiment is from the June 2016 sentiment Kit Succulent Salutations. The other is from a beautiful set by Tierra Jackson called Simply Lovely Birdie.
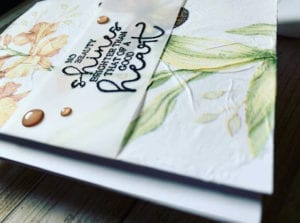
I love the colors and designs on this napkin below. I followed the same steps on each napkin card. This sentiment is applied to vellum the same way as instructed above. This sentiment is from the January 2018 sentiment kit called ...so very grateful. I love the look of the added matching enamel dots. How lovely is that butterfly peeking through the vellum!

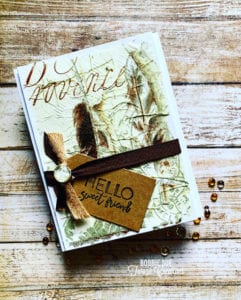
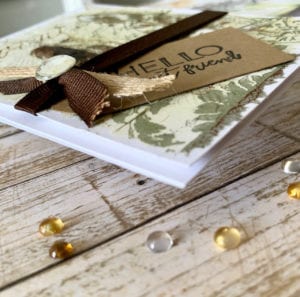
This old vintage looking napkin I used below is just gorgeous! Attach the ribbon to the back of the panel with scotch tape before adding the pop up foam tape. Next, I tied 2 different ribbons to the one I wrapped around and glued a bauble made from DSP using a mini circle punch and a 1/2 in glass cabochon. I’ve included a close up photo of the bauble. I make so many of these in different sizes! (I buy all my glass cabochons on Amazon.) The sentiment is from a Graciellie Designs set called Sweetness.

I purchased each set of napkins at Tuesday Morning, but Amazon has some really beautiful napkins to choose from!
HOW TO
Here are the steps in preparing your napkin for the card.
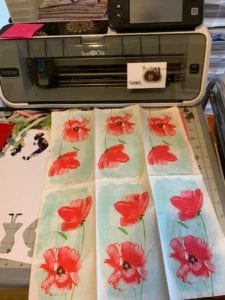
To better serve you, make sure the napkins you buy are printed on an entire side. Here, I am able to make 6 card panels from one napkin!
I ended up cutting the folds apart rather than tearing each section away from the folded out napkin. As you can see in this photo, once you cut away your panel, you will wet all four sides of the napkin to make tearing it down easier. You are able to have better control of your tear with the napkin wet as apposed to tearing it dry.
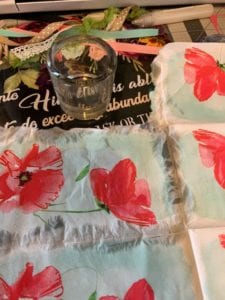
Take notice that your napkin is 2 or 3 ply and you need to pull it down to one ply. You can seperate the layers before or after you tear. It doesn't matter. I keep the blank layers to use in future projects!
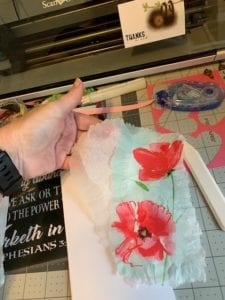
When you have chosen the size panel you want ( I like to cut my panel a 1/4 in smaller vertically to the card base and pop up with foam tape) you will then add mod podge to the area that your torn napkin will cover. Dip the tip of your fingers in the water and then in the glue until your surface is covered. It is just fine if your glue area ends up slightly bigger then your torn napkin. It dries completely and transparent.
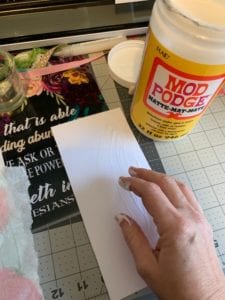
Place your torn piece over where you had spread the mod podge, (as it appears in the photo below) then dip your fingers in both water and mod podge to gently dab on top of the napkin adhering it onto the panel. Being careful to not rub too hard for fear of ripping your napkin. If you do rip the napkin you should be able to piece it back together just fine. Smooth out the edges with wet/glued fingers to assure adhesion. If you'll notice, your napkin will appear wrinkled. It may even create a few air bubbles, but I promise that's ok! If you'll look closely at the photos, you'll absolutely love the look it gives!
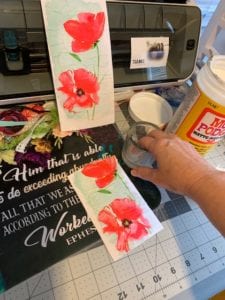
I put my finished panel in front of a fan to speed up the drying process. You can also take your heat tool to help dry. Your finished panel will be warped once dried. Simply place it under a heavy object. Also, when I attached it to the base with foam tape it helped straighten it out.
Attach this panel to your card base as you would any other card you make.
Challenge Details
I hope you are excited to try this technique! This challenge runs through April 28th. This gives you plenty of time to find the most perfect paper napkins! I truly look forward to seeing your paper napkin cards in the Unity Show and Tell group. Be sure to tag me in your post in the Show & Tell group or on IG! If you have any questions regarding my steps in creating these cards, feel free to contact me here or here. I am always happy to help!
As a thank you for visiting my blog, If you participate in this napkin decoupage card challenge using Unity Stamps, you will have the chance to win a $25 gift certificate to Unity Stamp Co. I will be gifting the certificate, but if you visit the USC blog there are details how you can win stamps from Unity! How amazing is that! To win the $25 gift certificate by participating in my challenge I ask that you comment below, AND tag me in your posted creation whether in Unity S&T or on IG. I am truly excited to see your project, friend! Winner will be chosen April 28th.
I invite you to join me again next week as we use a beautiful technique that will transform the look of your card or even tag!
As always~
Thanks for spending time with me today!
Until next time~
Be blessed, friends!
Bobbie Sue


This is such a cool idea! I’m roaming the house looking for napkins.
ReplyDeleteMelinda!! I didn’t know you were Card Knock!! I’m so so excited you want to play along!! I have so many amazing napkins I’m happy to mail a few! 🤗
DeleteWow, this is a flashback technique for me! I wonder if I have any printed napkins...
ReplyDeleteThanks for coming on board to bring us challenges. Looking forward to them.
Thank you so much, Kathryn. I appreciate your kindness and excitement!
DeleteCool idea. I have so much of printed napkins for bottle decoupage. I can put them to use. Thanks for sharing this.
ReplyDeleteI am so glad you are going to do this! I'd love to see! Thank you!
DeleteI’m so excited for you, Bobbie Sue! I can’t wait for my napkins to get here so I can play... well, I need to organize some more and find my mod podge, but I have time!! Yay! Thanks for the fabulous inspiration!
ReplyDeleteThank you so very much, my dear friend!!! Find that mod podge!! :)
DeleteThis is so exciting! I am so happy for you! Looking forward to your challenges and creations. You're off to a fabulous start...these cards are ahh-mazing! Hugs!
ReplyDeleteDawn, thank you so much!! I appreciate your sweet comment and encouragement!! ((Hugs)) back!!
DeleteLove your cards Bobbie Sue!! And such fun to use this technique again!!
ReplyDeleteLove your cards Bobbie Sue. You give us so much inspiration and education on new things to try. So excited to see what you come up with next !!
ReplyDeleteWhere did I put those napkins? This may require that Tuesday Morning trip? 😉
ReplyDeleteBought some napkins today and can't wait to try this technique that I had used way back in the day! Did you use regular or watercolor cardstock?
ReplyDeleteGreat challenge idea. These cards are just gorgeous! So fun!
ReplyDeleteFlashback to grade school for me! I love the look of these. I’ll dig out some of my fun fancy napkins to play along. I had to go buy Mod Podge today.
ReplyDeleteedirne
ReplyDeletetrabzon
adana
yozgat
Q6E