Saturday, June 29, 2019

Christmas in July

Hi, friends!

I have a feeling you are wondering why in the world I am sharing a Christmas card!! Well, Christmas in July of course! And this amazing digital set from Polka Dot Orchard came just in time for me to give you a sneak peak at what is coming to Two38 Creations next week!

Who else is taking part in Christmas in July?! I would love to know. :) If you aren't I would love for you to join me!

My dear friend Crystal from Tawny Owl Paperie designed this digital set and I am over the snowflake in love with it! She aptly named it Magic of Christmas. I have linked it for you here as it has just been published for purchase over at Polka Dot Orchard!


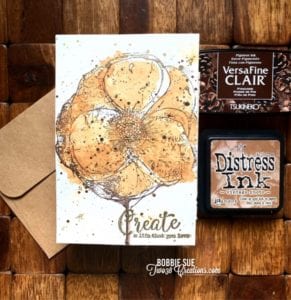
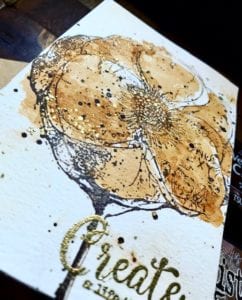
One of the reasons I love digital stamps so very much is because you can move them around and place any where you want. I love the outcome of this card and plan to make several more with this  exact design I created with three of the images available in the set. I just can't get over how amazing the boots, hat and belt are!


I would love to know when you purchase this set so I can be on the lookout for your card!


If you would like some tips on working with digital stamps, I would love to help. Comment here of message me on Facebook. My social media accounts are linked at the top of this page.

If I may, I'd love to invite you to follow my blog.
There is a "follow" button up a bit and to the right. --->
Not the follow by email, it's up just a bit from it. Thank you so much!

(Unfortunately, I don't think you have access to the follow button from your phone. Please, correct me if I am mistaken.)

It brings me so much joy sharing my thoughts and creations with all of you!

As always~

Thanks for spending time with me today!

Until next time~

Be blessed, friends!

Bobbie Sue


Forgive any grammar mistakes you may find. However, I am always open to friendly and constructive criticism or correction. Please know, I write my blog out of absolute enjoyment and do not stress over possible minor errors within. I appreciate you, friends! 


Thursday, June 27, 2019

Monochromatic Double Sided Card


Hi, friends!
Bobbie Sue here, with my final Unity blog post. As sad as I am to be done, I've had the very best experience being with you all on the Unity blog each Thursday for the past 3 months.


You can still catch me here on my personal blog for cards and creations!

This weeks mini challenge is my favorite of them all! Speaking of favorites, I would love to know which challenge has been your favorite? For an extra giveaway, be sure to comment here and let me know which challenge has been your favorite.


For this challenge I want to see your take on a monochromatic double sided card. I truly enjoyed creating this card and was completely inspired by the monochromatic theme. How gorgeous are these shades of brown/beige!?


The front side of the card uses Donna Downey's  "wild geranium" . This amazing flower measures 3x6.75" and is definitely a must have! The background stamp is called "Vintage Ledger". I simply masked the flower, stamped the ledger and faux distressed the edges. I'm loving the overall look. The sentiment is from a Graciellie Design called "Here's to love & friends"
Wait until you see the backside of this card!
The design of the back  was partially inspired by my talented friend and card creator Donna B. I am so in love with this Donna Downey stamp called "YOU are important". Even left uncolored, it is so gorgeous! You must put this set on your wish list! The sentiment is from another amazing set by Lisa Arana called "...she never says never". I have used so many pieces from this set time and again.
A close up of the amazing splatters and gold embossing.
Here are some quick steps I took in making this double sided card:
  1. Each side is stamped on a separate piece of watercolor paper. I tried a new to me wc paper I found on clearance at Hobby Lobby. It is a cold press by Grumbacher 140 lb 300 GSM. All images are stamped with VersaFine Clair in Pinecone. My absolute favorite!!
  2. The sentiment on side 2 was heat embossed with the most beautiful gold called Gilded by Brutus Monroe. Check out the close up where I made random marks using a quickie glue pen and heat embossed with the same Gilded gold.
  3. Once completed and assembled, the panels were glued back to back and slid under a heavy object to flatten.
  4. This card measures 4.25" x 6.5" and fits in an A6 envelope.
This challenge runs through next Thursday. I'm incredibly excited to introduce your new Unity blog host, Shannon Edwards. She will be with you every Thursday beginning July, 4. I've had a glimpse of what she's bringing, and her very first challenge will leave you feeling incredibly empowered!
Remember, the favorite animal stamp challenge is still running through the end of this month! And the Cuddlebugs are on sale the remainder of the month, as well.

You've been awesome and I've been blessed. Thank you.

Have fun creating!

Until then, friends~

Be blessed,

Bobbie Sue


Thursday, June 20, 2019

Oh say can you see...


Hello again, friends!
Bobbie Sue here again, with another mini challenge.
There is something so reflective in making cards that celebrate our countries independence. It is an absolute reminder of our freedom that continues to be protected with tremendous sacrifice by so many.
Creating cards with deep meaning, cards that tell a story, those are my favorite. I don't even have to share the story for you to know the narrative.
This was my first time inking up the background stamp Stars of Worn. I love how vintage this stamp looks with many of the stars appearing worn. The flag heart is from the set Ragged Ol' Flag This is an amazing set that I encourage you to put on your wish list.
The words are from a sentiment that I masked off from a Graciellie Design set call Moments of Bliss. I have turned to this set time and again!


Here are the details in making this card:
  1. I stamped the stars background onto a piece of Canson XL watercolor paper. Stamping once with Distress ink in Barn Door and spritzing with water. Knowing I would want to make a second card, I followed the same steps again with Distress ink in Faded Jeans.
  2. Then, I cut both panels in half at an angle and worked on placement of the base before trimming down further.
  3. Next, I masked off the unwanted parts of my sentiment and slightly angled it to stamp in the center of the base.
  4. Here, I lined my cut panel pieces just above and below the sentiment to see where I need to trim in order to fit perfectly on my A2 card base. Popping them up with foam tape once trimmed.
  5. Lastly, I stamped my heart flag with both of the inks and cut out the image with a large heart hand punch. Popping it up onto the lower panel.
A fairly simple card to create with a beautiful outcome.
This challenge will run through next Thursday. Remember, the favorite animal stamp challenge is still running through the end of this month! And the Cuddlebugs are on sale the remainder of the month, as well. If you have any questions regarding any of the challenges, please know, you are always welcome to reach out to me.

Unity is making your participation even more rewarding by offering a prize for each challenge! Each week you have a chance to win some fantastic Unity stamps! Even here you have an extra chance at winning a $25 Unity gift card! Simply comment here, and tag me in your post on Show & Tell so I can see your creation. I will pick a winner from 10 or more comments.

Have fun creating!
I invite you to join me again next Thursday as we use our favorite stamps to create something that may have you seeing double!
Until then, friends~
Be blessed,
Bobbie Sue


Thursday, June 13, 2019

Ink smooshing with a sandwich baggie.


Hello again, friends!

Remember how fun it was to make ink smooshing cards with Laura?! Well, we are going to do it again!! It is absolutely one of my favorite card techniques.

So get out your favorite Unity stamps and make some ink smooshing cards of any style. (Be sure your creation is new for each challenge! :) And remember, this challenge runs through next Thursday morning!

As a reminder regarding June's favorite animal stamp; don't forget the entire line of Cuddlebug stamps are going to be on sale the entire month of June! Just for you. ;) Here is a link to the entire line of Cuddlebug, including their cut files. So grateful to Whitney and Angela for offering this!
For this weeks mini challenge I am showing you two cards made for the challenge and a few ink smooshed cards I have made in the past.

**********************************************************

This first card uses stamps from Succulent Greetings , and hugs, kisses & birthday wishes. Green and yellow look great smooshed together!


On this next card I used stamps from the sets abundant blessings and Flutters to Go.
I've always adored this coffee cup and have used it on several cards, and tags!


Here are the details in creating this card:
  1. First, I made a vertical A2 card base from heavy cardstock, an A2 panel from a decorative piece of cardstock, and a top A2 panel from Canson XL watercolor paper. I've cut down the top panel by 1/4 inch so the bottom panel would be visible on both sides.
  2. Here's where I begin the ink smooshing steps on the top panel. The very bottom of this post I've detailed my ink smooshing technique using a plastic sandwich baggie.
  3. Next, I stamped the coffee cup image on a piece of scrap watercolor paper. After having water colored the image, I let my Scan n Cut fussy cut for me. ;)
  4. Then, I stamped the sentiment on another piece of scrap wc paper and glued it, slightly off, to a piece of the same paper I made the bottom panel with.
  5. Now I start to assemble the card by gluing the bottom panel to the card base, and popping up the top panel.
  6. Lastly, I popped up the coffee cup over the ink smooshed part of the top panel, and glued the sentiment to the edge of cup.
The 3 ink smooshed cards below are some I've made over the last several months. This is truly a favorite technique of mine! The feather over purple is the first card I completed after discovering ink smooshing. I used a piece of acetate to apply the ink before discovering I preferred using the baggie.


I'm super excited to see all of your creative and unique designs using this technique.

*****************************************

Unity is making your participation even more rewarding by offering a prize for each challenge! Each week you have a chance to win some fantastic Unity stamps! Be sure to post your creations in the challenge album over at Show & Tell!

Have fun creating!

Be sure to join me again next Thursday for a new mini challenge as we use our favorite stamps to creating something that will have you seeing stars!

Until then, friends~

Be blessed,

Bobbie Sue

My technique for ink smooshing with a sandwich baggie:

(I think I like so use the sandwich baggie because it allows you to really control where you touch down your ink.)
  • First, I apply color to the center of the baggie from a Tim Holtz's mini distress cube in a circular motion so that it doesn't lay down squared. Distress inks are a number one choice because they react beautifully with water.
  • Next, before I spritz with water, I lay a homemade stencil (usually a circle cut into the center of a piece of paper) over the baggie, but leaving the ink exposed.  I do this so the water goes on the ink and not the entire baggie. This helps me avoid spreading ink where I do not want it to go.
  • Now, I apply my wet ink to my panel. Sometimes I lay the baggie down and move the ink around, and sometimes I just touch it to the paper. This depends on the look I am going for. I do this in layers allowing to dry in between. This builds up the colors and allows them to each peak through the other.
  •  I like to do just a bit of splatter with another color when I am finished layering my smooshed ink. I do this just over and slightly surrounding the dry smooshed ink.

I encourage you to play around with this technique. Once you get the hang of it I think you will love it! Feel free to contact me if you have further questions.


Tuesday, June 11, 2019

Perfect Mason

Hello again, friends!

Perfect Mason indeed!

I am so excited to share with you the card I made with a new and amazing digi set from PolkaDot Orchard. <----- I linked the digi set here. You are going to want this incredible set!
If you do not know how to work with digital stamps I encourage you to learn how. I just learned how over the last 4 months. It is one of the best creative tools I could have discovered! There are several programs available for working with digital stamps. I most enjoy Photoshop Elements. It will seem confusing at first, but looking back now it was very easy to catch on to.


Here are the details in making this card.

  • In PSE I love that you can layer different images. Which is what I did with the mason jar/flag and flag banner.
  • Once printed with my Epson printer on Canson XL, I watercolored the images paying careful attention to add shading. I love how shadig makes the images appear 3D.
  • I added the stars with a metallic gold texture paste by Brea Reese through a Vicki Bouton stencil. Once dried I went over them with white paint to tone down the color a bit.
  • Next, I printed out the sentiment and cut the words apart. They are glued onto black cardstock and popped up with foam tape.
  • Lastly, I glued down a beautiful blue cardstock to the base and popped the panel over it.
I am so proud to give a shout out to the designer of this specific PolkaDot Orchard digi set. My dear and extremely talented friend, Jeanie Hayes. You can find her as The Washi Horse. Look at all of the fantastic images and sentiments you get with this set. It is on sale right now, friends!


If I may, I'd love to invite you to follow my blog.
There is a "follow" button up a bit and to the right. --->
Not the follow by email, it's up just a bit from it. Thank you so much!
It brings me so much joy sharing my thoughts and creations with all of you!

(Unfortunately, I don't think you have access to the follow button from your phone. Please, correct me if I am mistaken.)
As always~
Thanks for spending time with me today!
Until next time~
Be blessed, friends!
Bobbie Sue


Forgive any grammar mistakes you may find. However, I am always open to friendly and constructive criticism or correction. Please know, I write my blog out of absolute enjoyment and do not stress over possible minor errors within. I appreciate you, friends! 


Thursday, June 6, 2019

Father's Day and/or Masculine Unity Challenge

Hello again, friends!
 
Father's Day is quickly approaching and I would love to see your take on masculine cards. This style of card I do not make enough of.
 
I am sensitive to the fact we all approach Father's Day differently. You are welcome to create masculine cards of any style using your Unity stamps. (Be sure your creation is new for each challenge! :) And remember, this challenge runs through next Thursday morning!
 
As a reminder regarding June's favorite animal stamp; don't forget the entire line of Cuddlebug stamps are going to be on sale the entire month of June! Just for you. ;) Here is a link to the entire line of Cuddlebug, including their cut files. So grateful to Whitney and Angela for offering this!
 
For this weeks mini challenge I created both a Father's Day card and a masculine card. This first card is for one of my granddaughters to give her daddy.
 
This was my first time inking up Angie Blom's "First Love, First Hero" kit. What a precious image this is. This image perfectly captures the relationship Gil & Syvalee have. The sentiment is a combination of stamp sets "thanks for being fun" and "BONUS dad".


This next card was made by stamping only. No coloring of any kind. It is actually my favorite of the two! Typically I struggle with designing masculine stamps, but I truly love the simple nature of this one. As a matter of fact, it has inspired me to make more!
 

Here are the details in making this card:
 
1. First, I made a vertical A2 card base from Kraft cardstock and an A2 panel from a heavy white card stock. I've cut down by 1/4 inch so the card base would be visible on both sides.

2. Next, the panel was ran through a bead board embossing folder by Taylored Expressions.

3. Then, I stamped a strip of paper the length of the panel and the width (1.5 in) with the barn wall background stamp from the set "Bitty Backgrounds". The paper strip is popped up on the panel with foam tape.

4. Next, I stamped the beautiful image from Lisa Arana's set "Bonus Dad", cut it out with a circle die and popped it up with foam tape. I also stamped the image onto the flap of the cards envelope.

5. Lastly, I used a sentiment from this set and popped it up just slightly onto the circle.

I'm excited to see all of your masculine cards. I am sure to be inspired by your designs!
 
*****************************************
 
Unity is making your participation even more rewarding by offering a prize for each challenge! Each week you have a chance to win some fantastic Unity stamps! Be sure to post your creations in the challenge album over at Show & Tell.
 
Have fun creating!
 
Be sure to join me again next Thursday for a new mini challenge as we use our favorite stamps to creating something smashingly awesome!
 
Until then, friends~
 
Be blessed,
 
Bobbie Sue

Sunday, June 2, 2019

Growing in Unity Blog Hop

 Hello, friends!

Today is our GIU (Growing in Unity) blog hop with Unity Stamp Co. Looking back at my time as a GIU friend in April I smile. What a fantastic week that was. If you didn't catch my week I encourage you to look back at my posts entitled GIU. I think you will find lots of inspiration!

For todays hop I created three completely different looks. I steered way from my usual CAS look and had fun with color! Especially on this first card!

I used Angie Bloms rainbow from the May 19 KOM. I had fun just coloring and dotting! This reminded me that I do not use enough color or free flowing design. Sometimes it is good to just start creating with no design in mind. Even if it's not your typical creating style; the process was enjoyable! Aahhhhhh...


 This tag is quite large and will look great wrapped around a gift basket for my niece. These little birdies, from Lisa Glanz's "Happy Places", are the cutest! (The sprigs they are resting on are also from this set.) I love the font of the sentiment from her set "Please Deliver To".


Have you seen the May Sentiment Kit called "...say it big "from Lisa Arana? It is a must have with it's large bold words! Very versatile. You can never go wrong with purple and black. :) Two products in my stash I am trying to use more; stencils and washi tape. I always forget to use them! Do you find you forget how well these accent your cards?


My hope is that you have been inspired to create outside of your normal style as I've done.  I would love to know which card is your favorite!
 
*******************************
 
If I may, I'd love to invite you to follow my blog.
There is a "follow" button up a bit and to the right. --->
Not the follow by email, it's up just a bit from it. Thank you so much!
It brings me so much joy sharing my thoughts and creations with all of you!
(Unfortunately, I don't think you have access to the follow button from your phone. Please, correct me if I am mistaken.)
 
As always~
 
Thanks for spending time with me today!
 
Until next time~
 
Be blessed, friends!
 
Bobbie Sue

I hope you have a chance to visit each blog. I know they are all equally as wonderful and unique!  If you've not, please see the blog hop list at the bottom of this post and prepare to be inspired!

Unity will be giving prizes from this hop so be sure you comment on EACH blog post!
 
 The hop started with


You are here with me-
 
Bobbie Sue McConathy https://www.two38creations.com
 
Be sure to visit next-


Saturday, June 1, 2019

Friends of Unity June Blog Hop ~ Wedding

Hi again, friends! Welcome to June! 

And welcome to our June blog hop entitled "Wedding"!

Take me to a country wedding and my heart just patters. This first card reminds me of a country wedding. Simplicity. Lots of love and the perfect bouquet. Hand picked flowers, baby's breath and twine.

This beautiful flower set is from the April 17' KOM called Be My Bird.

The heart of love is from the Jan 18' KOM called Twinkle.

The sweet sentiment is from Angie Blom's From this day forward


Speaking of From this day forward... How GORGEOUS is this set!?! The flowers, the couple!! All just gorgeous and all from this set!

I  love the look of the beautiful flowers peaking from around the bride. It's is as if they are giving us a hint of her bouquet.
 
 
I so wish you could see the shimmer of the veil! Wednesday I had posted a boomerang video, in my IG stories, with a sneak peak of the card showing the incredible live shimmer of the veil. I've posted it again for those who missed it. (you can also see it in my Two38 Creations business page stories)
 
The amazing shimmer is from Gansai Tambi Starry watercolor set. I love this wc set so much! The gold from this set makes fantastic spatters!
 
 
As always, I would love to know your thoughts on these cards. :) Do you have a favorite?
 
 ******************************************************
 
 If I may, I'd love to invite you to follow my blog.
There is a "follow" button up a bit and to the right. --->
Not the follow by email, it's up just a bit from it. Thank you so much!
It brings me so much joy sharing my thoughts and creations with all of you!

(Unfortunately, I don't think you have access to the follow button from your phone. Please, correct me if I am mistaken.)

As always~

Thanks for spending time with me today!

Until next time~

Be blessed, friends!

Bobbie Sue

I hope you have a chance to visit each blog. I know they are all equally as wonderful and unique!  If you've not, please see the blog hop list at the bottom of this post and prepare to be inspired!

There are some pretty awesome giveaways with this hop! Including one from myself! Be sure you comment on EACH blog post to be entered in the drawing. 
 
Speaking of winners! Congratulations to Linda Vigil for winning from May's Hop! Thank you for such a sweet sweet comment last month! Please, contact me here to collect your winnings!

This months winners will be announced during next months blog hop!
(I have a feeling you will comment anyway as a way of support and admiration to the artists.)

Friends, please know that our hops are not sponsored. (Although, I know Unity Stamp Co. lovingly approves) Because your support is so valuable and so appreciated, prizes are given from the creators own private stash of Unity stamps.

 The hop started with
 
You arrived here from
Eileen 

You are here! 
ME
 
Dawn

Jeannie

Robyn

Kim


Forgive any grammar mistakes you may find. However, I am always open to friendly and constructive criticism or correction. Please know, I write my blog out of absolute enjoyment and do not stress over possible minor errors within. I appreciate you, friends!