Thursday, December 12, 2019

Gnome sweet Gnome

Hello, friends!
I am so so excited to share some new digital stamps at PolkaDot Orchard just released today! I don't know about you, but I have caught the gnome bug. And I love it!! These  are quickly becoming my favorites.
Can you even handle the cuteness!!!


This first one was created by such an incredible artist new to PDO. Help us warmly welcome Malaine with Hope and Dimples Studio.
 
I am so loving the carolers singing Gnoel Gnoel! So fun to create with. Below you see each of the fabulous digis that come with this set.


You gotta put this in your cart! This set is called Caroling Gnomes. So many possible combinations to create so many projects!


I am so smitten with this guy below! Gaaahhhhh he's fantastic!!! My dear friend,Crystal, at Tawney Owl Paperie created this gem of a gnome.

I could not wait to show you this set called From our Gnome to Yours!


Look at this set! Are you as excited as I was/am to begin using it?!?


I would love to know what you think of these new adorable sets and my cards! Commenting below would make me oh so happy. ;)


I am so excited to see what you create with both of these darling sets! I'd love for you tag me as Two38 Creations so that I am sure to see your project.

Thanks for spending time with me today!

If I may, I'd love to invite you to follow my blog.
There is a "follow" button up a bit and to the right. --->
Not the follow by email, it's up just a bit from it. Thank you so much!
It brings me so much joy sharing my thoughts and creations with all of you!

Until next time~

Be blessed, friends!

Bobbie Sue


Saturday, November 2, 2019

Friends of Unity November Blog Hop ~ Giving Thanks


Hello, friends.
Welcome to November and welcome to our Friends of Unity Blog Hop. 
This months cue is all about "Giving Thanks".


(Forgive me, I became quite sick on Thursday and was only able to complete one new card.)
I do love this card below. Gratitude is a powerful expression of  "Giving Thanks".
Did you know that gratitude has been scientifically studied and proven to promote health and well-being.


I have made countless cards with this new "A little warmth" set released in September. It is so fun to create different skin tones, hair colors and outfits.


I made this card for one of my daughters-in-law as she is always so eager to help me when I am sick. I am truly grateful for the relationship I have with all of my daughters-in-law and step-children. It is amazing how I can love them as I do my own 4 precious grown children.


I am so used to bringing you more than one card that it seems odd adding my closing remarks already!


As always~
Thanks for spending time with me today!

If I may, I'd love to invite you to follow my blog.
There is a "follow" button up a bit and to the right. --->
Not the follow by email, it's up just a bit from it. Thank you so much!
It brings me so much joy sharing my thoughts and creations with all of you!

Until next time~

Be blessed, friends!

Bobbie Sue

I hope you have a chance to visit each blog. I know they are all equally as wonderful and unique!  If you've not, please see the blog hop list at the bottom of this post and prepare to be inspired!

There are some pretty awesome giveaways with this hop! Including one from myself! Be sure you comment on EACH blog post to be entered in the drawing.

This months winners will be announced during next months blog hop!
(I have a feeling you will comment anyway as a way of support and admiration to the artists.)

Friends, please know that our hops are not sponsored. (Although, I know Unity Stamp Co. lovingly approves) Because your support is so valuable and so appreciated, prizes are given from the creators own private stash of Unity stamps.

The hop started with

You are here! 
ME
Joyce
Dawn F.


Forgive any grammar mistakes you may find. However, I am always open to friendly and constructive criticism or correction. Please know, I write my blog out of absolute enjoyment and do not stress over possible minor errors within. I appreciate you, friends! 

Tuesday, October 29, 2019

Guest Designer with Brutus Monroe ~ Whale, Happy Birthday!

Hello, friends!

Bobbie Sue, here! What an honor and joy to be guest designing for Brutus Monroe this month!

Have you ever had a birthday shout out from a big blue & adorable whale? No? Well, you have now! Check out these adorable sea sweeties. I am not sure which ocean critter I enjoyed coloring more. They are all so fun to work with.

This card was created using the Tangled Waves stencil and the Fish Bowl stamp set. The sentiment is from Sharon's Scripts sentiment set. I couldn't wait for this sentiment set to arrive! It is full of stamps for various occasions. And the font is just stunning!


I love this big ol whale and his cheeky grin! And that jellyfish. He looks pretty adorable and innocent, but he carries a stinging punch! I am absolutely loving this waves stencil! It will be beautiful as a simple background even if your card is not water themed.


Here's how I created this card.
  1. I started by stamping all of my images and sentiment onto a scrap piece of Canson XL watercolor paper. All of the images are colored with Brushmarker Pro watercolor markers. After coloring, I cut off my sentiment and ran the sheet trough my Scan n Cut to fussy cut the images for me.
  2. Next, I stenciled the Brutus Monroe Tangled Waves stencil onto an A2 panel of Neenah cardstock using Distress Oxides in Blueprint Sketch and Chipped Sapphire.
  3. The panel is popped up onto an A2 card base with the mega roll of foam tape from Brutus Monroe. (You need this in your life!) 
  4. Lastly, I assembled my colored images, and sentiment, popping them up with foam squares.

I considered adding a sky to the negative space, but I really love the clean look. What would you have done differently? I'd love to know!


Thank you for spending time with me today. I hope you enjoyed this card as much as I enjoyed creating it!

I invite you to comment below and let me know which of these adorable sea critters is your favorite!
I would love to connect with you! You can find me on Facebook here, Instagram here and my blog here.

See you again soon, friends!
Be blessed,
Bobbie Sue


Sunday, September 29, 2019

Guest Designer with Brutus Monroe ~ Fluttering Butterflies

Hello again, friends!

Bobbie Sue here. I am so excited to be guest designing with Brutus Monroe this month.

I've made a couple of cards showcasing Brutus Monroe's gorgeous "Flutter" stamp! I recently received this stamp and am so impressed with the amazing detail of the butterflies! When you have detail this crisp you can create without color and still get that WOW factor!

I love big cards! And I can not lie. It's true! 4 x 9.25 cards are beautiful! (They use a #10 envelope.)

I am crazy about this card! I know. I used color. But only to splatter with! Look how gorgeous those butterflies are in black and white!


Stamping the butterflies was very tricky as there are only 3 per side. I wanted them to trail along the entire length of my card, so lots of finagling was had! Since all the ends of the butterflies are cut off I knew I would have to do some added drawing for the butterflies to line up as one continuous stamp. It worked out much easier than I had thought!

Steps to create this card:
  1. First I cut a 4 x 9.25 panel using Bristol Smooth.
  2. Then, I stamped a side of the stamp that would easily flow with another side of the stamp and masking of parts I didn't want to ink. Now I needed to line up another side and mask off parts of the image I didn't want to ink. I left a small gap between the end of my first line of butterflies and the beginning of my second. This allowed me to draw the missing parts so that it would flow.
  3. Once my butterfly trail was stamped and connected, I added a shadow around each one using a medium gray Zig marker blending out to fade with a Zig clear blending pen.
  4. Next, I stamped the Hello from Sharon's Script stamp set directly to my card panel.
  5. Then, I placed the hello stamp back over the sentiment so that when I splattered my copper/gold the color would not get on or directly around word. I did, however, remove it when I splattered the black.
  6. Once dried I attached the panel to the #10 card base, made from black cardstock, using Tombow permanent adhesive. Cutting approximately an 1/8 in from around the panel so that it would have a slight black border.
This card proved to be a challenge, but I learned some things along the way and I love the result!

*************************************************************************

On this next card I stamped 1/4 of the stamp on one side and 1/4 of the stamp on the other. The full image measures 5.5 x 5.5, but I wanted my card to be 4.75 x 5. I was not concerned with the middle part not lining up since I was adding the sentiment on a strip in the middle. The top middle panel is popped up with Brutus Monroe foam tape. This tape gives the perfect height when wanting dimension from one layer to the other.


I absolutely love this gold on black embossed panel! I love Brutus Monroe's Gilded embossing powder. It is the most gorgeous gold!


If you have not purchased this background stamp, I encourage you to. There are so many creative possibilities in using it.

I would love to hear your thoughts on the techniques I used! Which card is your favorite? Mine is definitely the first card!

Thanks for spending this time with me, looking at my makes and enjoying my blog!


I would truly love to connect with you! You can find me on Facebook here, Instagram here and my blog here.

See you soon, friends!

Be blessed,

Bobbie Sue


Monday, September 23, 2019

Guest Designer with Brutus Monroe ~ Paper Cranes take flight.


Hello, friends!

Bobbie Sue, here! I am so happy to be with you as a guest designer with Brutus Monroe.

I'm incredibly excited to share todays card with you. The stamp set I used is one of the most delicate and beautiful images I have ever worked with. As a matter of fact, this stamp set is so versatile it can be used for ANY occasion.

The card below showcases the beautiful Paper Cranes stamp set. I am just smitten with this entire stamp design! I would love to see your makes using this set.

When I first received this set I had so many thoughts of how to use these amazing cranes. I am quite happy with this layout and eager to create using this set again!

This card was so quick to make that I plan to make a few more to have in my stash.


Here are the steps in making this card:
  1. I double stamped the cluster of cranes onto a beautifully colored piece of DSP cut slightly smaller than an A2 panel.
  2. Then, I stamped the 4 single cranes onto a scrap piece of Canson XL watercolor paper and colored them with a Zig marker in beige. I love blending out color with a lighter version of the main color. In this case, I blended out the beige with a Zig marker in vanilla.
  3. Again, I let my trusty Scan n Cut do the fussy cutting for me. (I've not the patience nor the skill to fussy cut small images.) I popped up the cut out cranes on the panel using foam squares.
  4. Next, I attached the panel to an A2 card base using Brutus Monroe's mega roll of white foam tape.
  5. Lastly, I stamped the Miss You sentiment (from Sharon's Script) onto a scrap piece of white cardstock and attached it using foam strips.
Long after I finished this card I decided it was missing something that would give it more life. So, I covered the peeking panel, 2 of the cranes & the sentiment and splattered gold paint. I absolutely love the finished look this gave!


Look closely and you can see the shadow I added to the cranes using a Zig marker in light gray. I love how it gives the "in flight" effect. 


I am so happy to have had the opportunity to spend this day with you on the Brutus Monroe blog! I would love to hear your thoughts on this card and stamp set. Please, comment below. I read each comment with a smile.
I would truly love to connect with you! You can find me on Facebook here, Instagram here and my blog here.

See you again soon, friends!

Be blessed,

Bobbie Sue


Saturday, September 7, 2019

September Friends of Unity Blog Hop ~ Autumn Colors

Hello, friends! And welcome to our Friends of Unity September Blog Hop!

This months cue is all about Autumn Colors. There is something so magical about all the various colors of Autumn. So rich and vibrant! So enchanting and inviting! I am ready, as I know you are!

I thought pumpkin and leaves would be perfect for this months cards. If we were living at our Arkansas farm I would have pumpkins everywhere and I would never rake my leaves. Unless, of course it was for the grandbabies to jump in. :)


Help us in warmly welcoming Dawn Bryson and Alaine Tanner to our FOU faimly! So so happy and excited to have them as part of our team!

This first card is using Angie Blom's Pumpkin Patch Border. I truly stretched my coloring on this one by using a light blue on some of the pumpkins. I absolutely love the result! I honestly think this is one of my absolute favorite colorings I've ever done.


I used Stampin Up's Stampin Write brush pens. A friend from church graciously gave them to me and Oh how I love them! There is a beautiful blue grey that I colored the blue pumpkins with. Often I will use that color to shade also. Do you shade around your images to make them pop? I especially love to on all of the cluster borders that Angie creates.


 This next card was honestly a last minute decision. And by last minute I mean, last night. Ha.
It wasn't the vision I had, but I like it. The corner cut was inspired by a card Julissa had made recently. (What an amazing talent she is.)

 This leaf, from the set Obsessively GratefuI, is perfect for repeat stamping. I love everything Graciellie Designs creates and this one is no exception.

 I love all the colors of fall, but green is definitely my favorite. Especially olive green like the paper under the panel.


I'm obsessed with all the splatters! It is so fun to splatter various colors and see how they'll fall. My husband was changing the bulb in my ceiling fan and noticed my splatter box. He was clueless and quite confused about what I have been doing. Haha. I think he assumes I'm a messy painter. Lol

 We all need to share photos of our splatter boxes! Oh my gosh that would be awesome!

 Here are the details in creating this card:

  1. First, I repeat stamped the leaf onto an A2 size piece of Bristol Smooth and loosely watercolored them with Altenew watercolors.
  2.  After the watercolor dried I splattered the panel with various Picket Fence liquid watercolors drying with my heat gun after each color.
  3. Once the splatters dried I ran the panel through my Gemini with a scallop edge border die from MFT. I also had a piece of the olive green cardstock underneath so that I could use the cut off as shown.
  4. The sentiment from the set Sweetness is heat embossed in black onto a piece of vellum. (Although it looks brown in this light photo.) I wrapped it around the top panel securing to the back with scotch tape.
  5. I popped the panel up onto an A2 card base using an 1/8 in foam tape by Brutus Monroe. The green cardstock is also popped up, but using the smaller 1/16 in foam tape, also by Brutus Monroe.

When I held my last card class I made up several of these heat embossed sentiments on vellum. It is so nice to have them in my stash when I am pressed for time!

Do you see the beautifully embossed floral in the green cardstock? I bought this paper pack long ago from Michaels and absolutely love the different designs on each piece. I wish I could recall the name of the pack. I've not been able to find it since.

If I may, I'd love to invite you to follow my blog.
There is a "follow" button up a bit and to the right. --->
Not the follow by email, it's up just a bit from it. Thank you so much!
It brings me so much joy sharing my thoughts and creations with all of you!

As always~

Thanks for spending time with me today!

Until next time~

Be blessed, friends!

Bobbie Sue

I hope you have a chance to visit each blog. I know they are all equally as wonderful and unique!  If you've not, please see the blog hop list at the bottom of this post and prepare to be inspired!

There are some pretty awesome giveaways with this hop! Including one from myself! Be sure you comment on EACH blog post to be entered in the drawing.
Speaking of winners! Congratulations to Cindy Trudeau from my August blog! Cindy, thank you for such a sweet comment. :) Please contact me within 2 weeks for your wonderful prize!

 This months winners will be announced during next months blog hop!
(I have a feeling you will comment anyway as a way of support and admiration to the artists.)

Friends, please know that our hops are not sponsored. (Although, I know Unity Stamp Co. lovingly approves) Because your support is so valuable and so appreciated, prizes are given from the creators own private stash of Unity stamps.
The hop started with
Robyn
Dawn B.
Alaine
Kim
Dawn F.
Joyce
Jeanie
You are here! 
ME
I'm the final blog on the hop, but I hope you'll go back and visit all you may have missed!

Forgive any grammar mistakes you may find. However, I am always open to friendly and constructive criticism or correction. Please know, I write my blog out of absolute enjoyment and do not stress over possible minor errors within. I appreciate you, friends! 


Saturday, August 3, 2019

Friends of Unity Blog Hop ~ Furry Friends


Hello, friends!

Welcome to August and welcome to our Friends of Unity Blog Hop as we focus on Furry Friends!

I must admit that I do not create with many furry friend stamps. This proved to be a challenge for me, but I had a great time regardless all the mishaps. ;)

My first card was so quick to create and I love it. I've been wanting to send a "hello" card to a fellow crafter. His little dog is his very best friend, so this is perfect for him!


The dog stamp was in my latest grab bag. He is from Angie Bloms Lucky Dog stamp set. As a matter of fact, other than some playful pups from Phyliss Harris, he is the only dog stamp I own! He has a bit of a scowl on his face and it makes him irresistibly adorable!
He is simply stamped on a scrap piece of Bristol smooth. I added a bit of color with a Zig and fussy cut him out. I love this stencil from Taylored Expressions. I used my blending brush to add Distress Ink in Faded Jean. The sentiment is from Lisa Aranas Looking Foxy stamp set.
****************************************
For my second card I used Cuddlebug Kitty from Tierra Jackson. I adore her!


I stamped her in Distress Ink Vintage Photo onto Canson XL watercolor. What I love about stamping in Distress Ink is that you can use the ink from the image to move around color. When I know I don't want too much color on my image I simply run my wet brush over the stamped image and move it around to color with. Other than adding a bit of green to her eyes and a bit of pink to her nose, ears and pads, I did not need add any additional ink to color this image. She is beautiful!

*************************************************
If I may, I'd love to invite you to follow my blog.
There is a "follow" button up a bit and to the right. --->
Not the follow by email, it's up just a bit from it. Thank you so much!
It brings me so much joy sharing my thoughts and creations with all of you!

(Unfortunately, I don't think you have access to the follow button from your phone. Please, correct me if I am mistaken.)

As always~

Thanks for spending time with me today!

Until next time~

Be blessed, friends!

Bobbie Sue

I hope you have a chance to visit each blog. I know they are all equally as wonderful and unique!  If you've not, please see the blog hop list at the bottom of this post and prepare to be inspired!


There are some pretty awesome giveaways with this hop! Including one from myself! Be sure you comment on EACH blog post to be entered in the drawing.
 
 This months winners will be announced during next months blog hop!
(I have a feeling you will comment anyway as a way of support and admiration to the artists.)

Friends, please know that our hops are not sponsored. (Although, I know Unity Stamp Co. lovingly approves) Because your support is so valuable and so appreciated, prizes are given from the creators own private stash of Unity stamps.


The hop started with
 

Eileen 


Kim


Jeannie


Joyce


You are here! 
ME

Robyn


 Forgive any grammar mistakes you may find. However, I am always open to friendly and constructive criticism or correction. Please know, I write my blog out of absolute enjoyment and do not stress over possible minor errors within. I appreciate you, friends! 


Saturday, June 29, 2019

Christmas in July

Hi, friends!

I have a feeling you are wondering why in the world I am sharing a Christmas card!! Well, Christmas in July of course! And this amazing digital set from Polka Dot Orchard came just in time for me to give you a sneak peak at what is coming to Two38 Creations next week!

Who else is taking part in Christmas in July?! I would love to know. :) If you aren't I would love for you to join me!

My dear friend Crystal from Tawny Owl Paperie designed this digital set and I am over the snowflake in love with it! She aptly named it Magic of Christmas. I have linked it for you here as it has just been published for purchase over at Polka Dot Orchard!


One of the reasons I love digital stamps so very much is because you can move them around and place any where you want. I love the outcome of this card and plan to make several more with this  exact design I created with three of the images available in the set. I just can't get over how amazing the boots, hat and belt are!


I would love to know when you purchase this set so I can be on the lookout for your card!


If you would like some tips on working with digital stamps, I would love to help. Comment here of message me on Facebook. My social media accounts are linked at the top of this page.

If I may, I'd love to invite you to follow my blog.
There is a "follow" button up a bit and to the right. --->
Not the follow by email, it's up just a bit from it. Thank you so much!

(Unfortunately, I don't think you have access to the follow button from your phone. Please, correct me if I am mistaken.)

It brings me so much joy sharing my thoughts and creations with all of you!

As always~

Thanks for spending time with me today!

Until next time~

Be blessed, friends!

Bobbie Sue


Forgive any grammar mistakes you may find. However, I am always open to friendly and constructive criticism or correction. Please know, I write my blog out of absolute enjoyment and do not stress over possible minor errors within. I appreciate you, friends! 


Thursday, June 27, 2019

Monochromatic Double Sided Card


Hi, friends!
Bobbie Sue here, with my final Unity blog post. As sad as I am to be done, I've had the very best experience being with you all on the Unity blog each Thursday for the past 3 months.


You can still catch me here on my personal blog for cards and creations!

This weeks mini challenge is my favorite of them all! Speaking of favorites, I would love to know which challenge has been your favorite? For an extra giveaway, be sure to comment here and let me know which challenge has been your favorite.


For this challenge I want to see your take on a monochromatic double sided card. I truly enjoyed creating this card and was completely inspired by the monochromatic theme. How gorgeous are these shades of brown/beige!?


The front side of the card uses Donna Downey's  "wild geranium" . This amazing flower measures 3x6.75" and is definitely a must have! The background stamp is called "Vintage Ledger". I simply masked the flower, stamped the ledger and faux distressed the edges. I'm loving the overall look. The sentiment is from a Graciellie Design called "Here's to love & friends"
Wait until you see the backside of this card!
The design of the back  was partially inspired by my talented friend and card creator Donna B. I am so in love with this Donna Downey stamp called "YOU are important". Even left uncolored, it is so gorgeous! You must put this set on your wish list! The sentiment is from another amazing set by Lisa Arana called "...she never says never". I have used so many pieces from this set time and again.
A close up of the amazing splatters and gold embossing.
Here are some quick steps I took in making this double sided card:
  1. Each side is stamped on a separate piece of watercolor paper. I tried a new to me wc paper I found on clearance at Hobby Lobby. It is a cold press by Grumbacher 140 lb 300 GSM. All images are stamped with VersaFine Clair in Pinecone. My absolute favorite!!
  2. The sentiment on side 2 was heat embossed with the most beautiful gold called Gilded by Brutus Monroe. Check out the close up where I made random marks using a quickie glue pen and heat embossed with the same Gilded gold.
  3. Once completed and assembled, the panels were glued back to back and slid under a heavy object to flatten.
  4. This card measures 4.25" x 6.5" and fits in an A6 envelope.
This challenge runs through next Thursday. I'm incredibly excited to introduce your new Unity blog host, Shannon Edwards. She will be with you every Thursday beginning July, 4. I've had a glimpse of what she's bringing, and her very first challenge will leave you feeling incredibly empowered!
Remember, the favorite animal stamp challenge is still running through the end of this month! And the Cuddlebugs are on sale the remainder of the month, as well.

You've been awesome and I've been blessed. Thank you.

Have fun creating!

Until then, friends~

Be blessed,

Bobbie Sue


Thursday, June 20, 2019

Oh say can you see...


Hello again, friends!
Bobbie Sue here again, with another mini challenge.
There is something so reflective in making cards that celebrate our countries independence. It is an absolute reminder of our freedom that continues to be protected with tremendous sacrifice by so many.
Creating cards with deep meaning, cards that tell a story, those are my favorite. I don't even have to share the story for you to know the narrative.
This was my first time inking up the background stamp Stars of Worn. I love how vintage this stamp looks with many of the stars appearing worn. The flag heart is from the set Ragged Ol' Flag This is an amazing set that I encourage you to put on your wish list.
The words are from a sentiment that I masked off from a Graciellie Design set call Moments of Bliss. I have turned to this set time and again!


Here are the details in making this card:
  1. I stamped the stars background onto a piece of Canson XL watercolor paper. Stamping once with Distress ink in Barn Door and spritzing with water. Knowing I would want to make a second card, I followed the same steps again with Distress ink in Faded Jeans.
  2. Then, I cut both panels in half at an angle and worked on placement of the base before trimming down further.
  3. Next, I masked off the unwanted parts of my sentiment and slightly angled it to stamp in the center of the base.
  4. Here, I lined my cut panel pieces just above and below the sentiment to see where I need to trim in order to fit perfectly on my A2 card base. Popping them up with foam tape once trimmed.
  5. Lastly, I stamped my heart flag with both of the inks and cut out the image with a large heart hand punch. Popping it up onto the lower panel.
A fairly simple card to create with a beautiful outcome.
This challenge will run through next Thursday. Remember, the favorite animal stamp challenge is still running through the end of this month! And the Cuddlebugs are on sale the remainder of the month, as well. If you have any questions regarding any of the challenges, please know, you are always welcome to reach out to me.

Unity is making your participation even more rewarding by offering a prize for each challenge! Each week you have a chance to win some fantastic Unity stamps! Even here you have an extra chance at winning a $25 Unity gift card! Simply comment here, and tag me in your post on Show & Tell so I can see your creation. I will pick a winner from 10 or more comments.

Have fun creating!
I invite you to join me again next Thursday as we use our favorite stamps to create something that may have you seeing double!
Until then, friends~
Be blessed,
Bobbie Sue


Thursday, June 13, 2019

Ink smooshing with a sandwich baggie.


Hello again, friends!

Remember how fun it was to make ink smooshing cards with Laura?! Well, we are going to do it again!! It is absolutely one of my favorite card techniques.

So get out your favorite Unity stamps and make some ink smooshing cards of any style. (Be sure your creation is new for each challenge! :) And remember, this challenge runs through next Thursday morning!

As a reminder regarding June's favorite animal stamp; don't forget the entire line of Cuddlebug stamps are going to be on sale the entire month of June! Just for you. ;) Here is a link to the entire line of Cuddlebug, including their cut files. So grateful to Whitney and Angela for offering this!
For this weeks mini challenge I am showing you two cards made for the challenge and a few ink smooshed cards I have made in the past.

**********************************************************

This first card uses stamps from Succulent Greetings , and hugs, kisses & birthday wishes. Green and yellow look great smooshed together!


On this next card I used stamps from the sets abundant blessings and Flutters to Go.
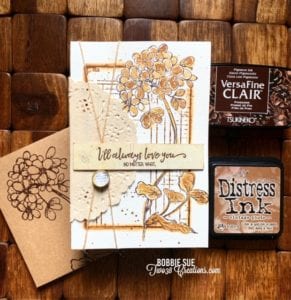
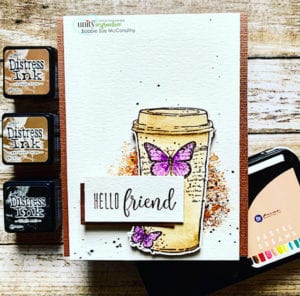
I've always adored this coffee cup and have used it on several cards, and tags!


Here are the details in creating this card:
  1. First, I made a vertical A2 card base from heavy cardstock, an A2 panel from a decorative piece of cardstock, and a top A2 panel from Canson XL watercolor paper. I've cut down the top panel by 1/4 inch so the bottom panel would be visible on both sides.
  2. Here's where I begin the ink smooshing steps on the top panel. The very bottom of this post I've detailed my ink smooshing technique using a plastic sandwich baggie.
  3. Next, I stamped the coffee cup image on a piece of scrap watercolor paper. After having water colored the image, I let my Scan n Cut fussy cut for me. ;)
  4. Then, I stamped the sentiment on another piece of scrap wc paper and glued it, slightly off, to a piece of the same paper I made the bottom panel with.
  5. Now I start to assemble the card by gluing the bottom panel to the card base, and popping up the top panel.
  6. Lastly, I popped up the coffee cup over the ink smooshed part of the top panel, and glued the sentiment to the edge of cup.
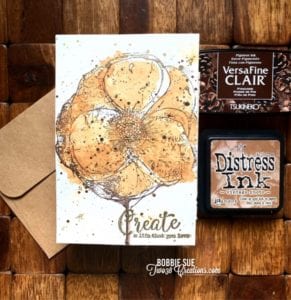
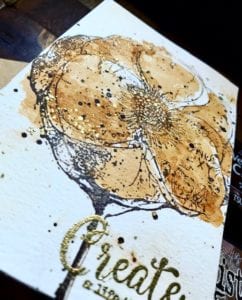
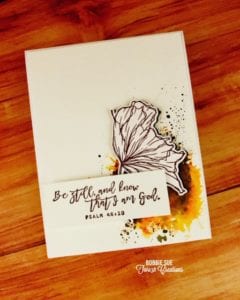
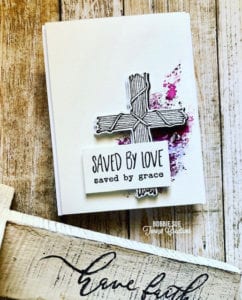
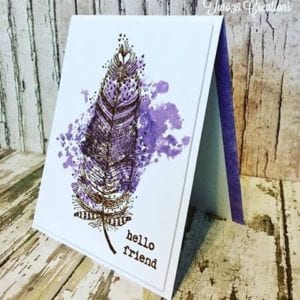
The 3 ink smooshed cards below are some I've made over the last several months. This is truly a favorite technique of mine! The feather over purple is the first card I completed after discovering ink smooshing. I used a piece of acetate to apply the ink before discovering I preferred using the baggie.


I'm super excited to see all of your creative and unique designs using this technique.

*****************************************

Unity is making your participation even more rewarding by offering a prize for each challenge! Each week you have a chance to win some fantastic Unity stamps! Be sure to post your creations in the challenge album over at Show & Tell!

Have fun creating!

Be sure to join me again next Thursday for a new mini challenge as we use our favorite stamps to creating something that will have you seeing stars!

Until then, friends~

Be blessed,

Bobbie Sue

My technique for ink smooshing with a sandwich baggie:

(I think I like so use the sandwich baggie because it allows you to really control where you touch down your ink.)
  • First, I apply color to the center of the baggie from a Tim Holtz's mini distress cube in a circular motion so that it doesn't lay down squared. Distress inks are a number one choice because they react beautifully with water.
  • Next, before I spritz with water, I lay a homemade stencil (usually a circle cut into the center of a piece of paper) over the baggie, but leaving the ink exposed.  I do this so the water goes on the ink and not the entire baggie. This helps me avoid spreading ink where I do not want it to go.
  • Now, I apply my wet ink to my panel. Sometimes I lay the baggie down and move the ink around, and sometimes I just touch it to the paper. This depends on the look I am going for. I do this in layers allowing to dry in between. This builds up the colors and allows them to each peak through the other.
  •  I like to do just a bit of splatter with another color when I am finished layering my smooshed ink. I do this just over and slightly surrounding the dry smooshed ink.

I encourage you to play around with this technique. Once you get the hang of it I think you will love it! Feel free to contact me if you have further questions.


Tuesday, June 11, 2019

Perfect Mason

Hello again, friends!

Perfect Mason indeed!

I am so excited to share with you the card I made with a new and amazing digi set from PolkaDot Orchard. <----- I linked the digi set here. You are going to want this incredible set!
If you do not know how to work with digital stamps I encourage you to learn how. I just learned how over the last 4 months. It is one of the best creative tools I could have discovered! There are several programs available for working with digital stamps. I most enjoy Photoshop Elements. It will seem confusing at first, but looking back now it was very easy to catch on to.


Here are the details in making this card.

  • In PSE I love that you can layer different images. Which is what I did with the mason jar/flag and flag banner.
  • Once printed with my Epson printer on Canson XL, I watercolored the images paying careful attention to add shading. I love how shadig makes the images appear 3D.
  • I added the stars with a metallic gold texture paste by Brea Reese through a Vicki Bouton stencil. Once dried I went over them with white paint to tone down the color a bit.
  • Next, I printed out the sentiment and cut the words apart. They are glued onto black cardstock and popped up with foam tape.
  • Lastly, I glued down a beautiful blue cardstock to the base and popped the panel over it.
I am so proud to give a shout out to the designer of this specific PolkaDot Orchard digi set. My dear and extremely talented friend, Jeanie Hayes. You can find her as The Washi Horse. Look at all of the fantastic images and sentiments you get with this set. It is on sale right now, friends!


If I may, I'd love to invite you to follow my blog.
There is a "follow" button up a bit and to the right. --->
Not the follow by email, it's up just a bit from it. Thank you so much!
It brings me so much joy sharing my thoughts and creations with all of you!

(Unfortunately, I don't think you have access to the follow button from your phone. Please, correct me if I am mistaken.)
As always~
Thanks for spending time with me today!
Until next time~
Be blessed, friends!
Bobbie Sue


Forgive any grammar mistakes you may find. However, I am always open to friendly and constructive criticism or correction. Please know, I write my blog out of absolute enjoyment and do not stress over possible minor errors within. I appreciate you, friends!