Good Morning, friends! Happy Tuesday!
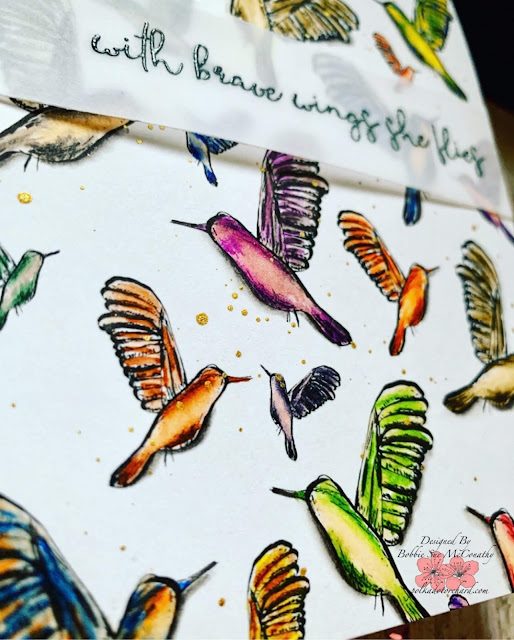
I couldn't wait to share todays card with you. Just look at this incredibly beautiful hummingbird from Polka Dot Orchard. One of the best things I could have done for my cardmaking/paper-crafting career was learning how to work with digital images. I am still learning!
Both the image and the design are from the digi set called Spread Your Wings. I can not encourage you enough to add this set to your digital image collections. All of the digital/printable images from PDO are such high crisp quality.
This card was an absolute joy to color. So many images allows such creativity! As I am writing this I notice that my sentiment is not centered. Ha. You know what. I am not at all bothered by it. I love it so much. Imperfections bring character. And character, beauty. I'll just pay closer attention to the next one. ;)
I colored the hummingbirds with Zig Kuretake real color brush pens. I finally mastered how to use them without water a couple weeks ago and I've been coloring like crazy! So much joy it brings! The only thing I used water on was the shadow underneath the birds. I needed it to fade out more than my lightest grey would allow.
Did you know?? You can print on vellum and heat emboss while the ink is still wet!
I discovered this a few moths ago and it is a game changer when working with digis! Do you see the beautiful gold splatters? Splatters, of all colors, add the perfect element to such a large and open background.
Details on how I created this card:
- After multiplying and resizing the image, (with help from a dear friend) I printed this layout onto Bristol Smooth. (It is the very best paper for using your Zigs on as it doesn't absorb right away and it is incredibly smooth.)
- I colored/blended these using Zigs. Once dry, I splattered gold watercolor ink using #903 from Kuretake Gansai Tambi
- I printed the sentiment on vellum from PTI. In my opinion it is the very best vellum for printing on. As soon as it printed I heat embossed in clear gloss embossing powder from WOW. I trimmed to desired size and wrapped it around my finished panel. I almost always wrap my vellum and attach to the back with an inexpensive scotch tape . This avoids the use of need to use an adhesive on the front of the card.
- Next, I popped up the panel with a foam adhesive to a vertical A2 card base.
- Finally, I attached my card insert that I will write my message on. I always add a folded insert to my cards. I love the finishing touch it brings to the overall feel of the card.
I do believe this is one of my absolute favorite cards. It is pretty clean and simple, yet has so much eye catching detail.
I hope you enjoy these creations as much as I enjoyed creating them!
The added links are NOT affiliates. I just like to enable you by giving you easy access. ;)
If I may, I'd love to invite you to follow my blog.
There is a "follow" button up a bit and to the right. --->
Not the follow by email, it's up just a bit from it. Thank you so much!
It brings me so much joy sharing my thoughts and creations with all of you!
(Unfortunately, I don't think you will have access to the follow button from your phone. Please, correct me if I am mistaken.)
As always~
Thanks for spending time with me today!
Until next time~
Be blessed, friends!
Bobbie Sue
Forgive any grammar mistakes you may find. However, I am always open to friendly and constructive criticism or correction. Please know, I write my blog out of absolute enjoyment and do not stress over possible minor errors within. I appreciate you, friends!


I LOVE what you did with that hummingbird digi --- genius idea and beautiful card!
ReplyDeleteGorgeous, gorgeous card! These humming birds really fly! Great work!
ReplyDelete