Friday, April 26, 2019

GIU Day 5 ~ This isn't goodbye.


Hello once again, friends!
 
Today is my final day as your GIU sister! But, it isn't goodbye. As I will be with you on the Unity Blog each Thursday through June!
 
Let's get to the cards because I am super excited for you to see what I have made!
 
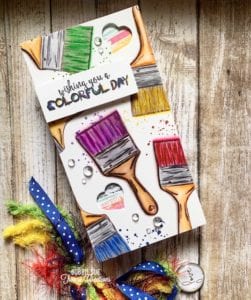
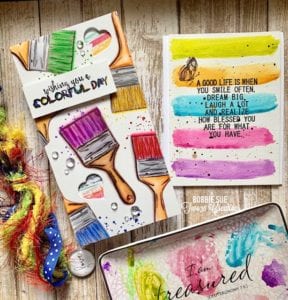
I used one of my very favorite techniques and style of cards. Can you believe I had to make all these starting at 4:45 a.m. this morning after I got my husband off to work?! :)
 
In bed last night I decided that what I originally had prepared for you would make a great mini challenge in Unity Show & Tell next Thursday. Soooo I had to make something all new this morning! I took me 3 hours start to finish to make all of these. They had to sit under my weighted tub for a bit as they were warped from being dried in between applying layers of ink. I had fun though and absolutely love the outcome!
 
Do you enjoy making card with the smooshing technique?
 
 
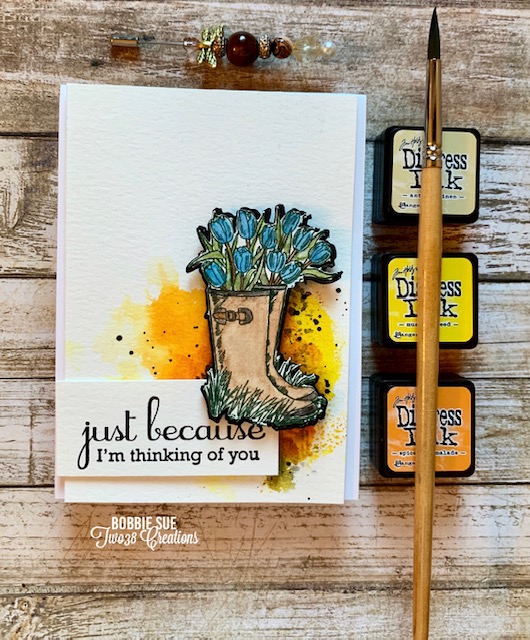
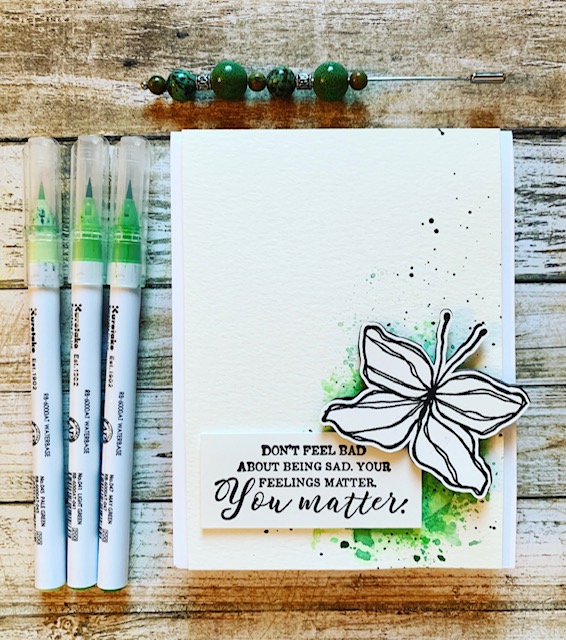
I used 3 different inks to create these. Zig real brush pens, Distress inks, and watercolor paint. I apply the inks with a small sandwich bag. I have found it smooshes the best! I simply apply some ink in a 1 1/2 in diameter, spritz with water and smoosh onto my paper of choice. My favorite placement is the bottom right corner. I dry them in between colors for a layered effect. If you would like a small photo tutorial please let me know in your comment and I will do one next week.
 
The image on this card is from Tierra Jackson's Joy and Brighter Days. I wish I had made the colors on the rainboots and flowers brighter and darker, but the beautiful background makes up for it! The ink is applied to watercolor paper.  I love this just because sentiment from the March 2015 Sentiment Kit called Blossoming Thoughts and Wishes.
 

 This card is so bright and beautiful! I absolutely love these shades of blue together! I used watercolor paper here, also. The diecut was colored with Zigs before having my Scan & Cut fussy cut it for me. I had 6 more cut to use as layering. I love the popped up look with layers instead of just foam tape. The following 3 butterflies are from Graciellie Design called Moments of Bliss .


Green is my favorite color and these 3 colors together are amazing! Especially with a little black splattered on top. This is also on watercolor paper. I love the look of the uncolored butterfly. (Also from Moments of Bliss.) I had my Scan & Cut cut out several images for each card made. Again, I love the popped up look using several die cuts.
 
This spot on sentiment is from Lisa Arana's Feelings Matter. I truly love it. "It's ok to not be ok. It's alright to not be alright. The one who holds the world in His hands is also holding you". <--- Paraphrased from a Beautiful song called "Maybe it's Ok" by We are Messenger (I've linked it in hope you will listen;)
 

The background of this card was made with Bristol Smooth paper and watercolors. I colored the butterfly with Zigs and love how the 3 different colors blended so beautiful and bright! The sentiment is from the April 2016 Sentiment Kit Mama's & Grandma's.

 
This concludes my week! As all those before me, we hate to see our GIU week end, but are so thankful for the opportunity.
 
I would love to know which card or cards where your favorite! The blue and green are mine! But I love them alllll!! It is ok to absolutely love what you create, friends! :)
 
 
I do have several items linked, but I am not an affiliate. I just like to enable you as best I can. ;)
 
I want to thank you for visiting me each day this week! You brought me joy and gave me lots smiles with your sweet comments. Remember, by commenting on my blog EACH day you will have a chance to win some pretty amazing stamps from Unity Stamp Co.
 
I will also be offering a thank you gift for visiting and commenting on my blog and FB post each day!
 
If you are here visiting me from Instagram I've a special thank you gift for one of you for commenting on my blog and IG post each day!
 
For those of you who fully read my blog, thank you so very much. I love being able to express myself through creating and writing, and I love sharing both with you

If I may, I'd love to invite you to follow my blog.
There is a "follow" button up a bit and to the right. --->
Not the follow by email, it's up just a bit from it. Thank you so much!
It brings me so much joy sharing my thoughts and creations with all of you!

(Unfortunately, you won't have access to the follow button from your phone.)

As always~

Thanks for spending time with me today!

Until next time~

Be blessed, friends!

Bobbie Sue
 
Forgive any grammar mistakes you may find. However, I am always open to friendly and constructive criticism or correction. Please know, I write my blog out of absolute enjoyment and do not stress over possible minor errors within the layout. I appreciate you, friends.


Thursday, April 25, 2019

GIU Day 4 ~

Hi again, friends!
 
Welcome to day 4 of my GIU week! I, along with my GIU friends, always feel this week goes by way too fast!
 
This blog post is a continuation of Mother's Day cards as today I have a featured card (and new challenge) on the Unity Stamp Company Blog. <--- Follow this link to see the first migration of butterflies I've ever colored! I think you'll love it!

This is me being transparent, friends. I love the coloring I did on the following two cards, but I do not care for the designs. I chose to use them anyway because I put a lot of effort into making them, and for that... I'm proud. ;)

I used the same Migration of Beauty as I did on the card with the Unity blog today. (It's really a beauty! You gotta go see it!) With both cards below I stamped in Versafine black. One on Canson XL water color paper and one of Bristol Smooth.
 
The first card I watercolored with a new to me 48 pan set of watercolors by Dainayw. These colors are very high quality and the pigment very rich and vibrant.
 
I love this sentiment from the April 2016 Sentiment Kit Mama's & Grandma's. I will stamp Happy Mothers Day on the inside of the card. (The Happy Mother's Day sentiment used on the other card is from this same kit.)

Someone asked me where I get the beaded pins that I started putting in my photos. They are called hat pins, (although they don't get put in a hat lol) but I make them myself. I buy the pins from Amazon and most of my beads when on sale at Michaels. I love making them and think they add a great flair to my photos. Occasionally I will wear one on my dress to church.
 
 
This next card was stamped on Bristol Smooth and colored with Zig brush pens and a Zig blender. I truly love the coloring on this one. Adoring how it fades. I am actually considering using this sentiment from Angie Blom's Include Yourself on both of my daughters cards, and my two daughters-in-law cards. I adore all of these beautiful ladies in my life.


I do have several items linked, but I am not an affiliate. I just like to enable you as best I can. ;)
 
Be sure to visit me again tomorrow as I conclude my GIU week! By commenting on my blog EACH day you will have a chance to win some pretty amazing stamps from Unity Stamp Co.
 
I will also be offering a thank you gift for visiting and commenting on my blog and FB post each day!
 
If you are here visiting me from Instagram I've a special thank you gift for one of you for commenting on my blog and IG post each day!
 
For those of you who fully read my blog, thank you so very much. I love being able to express myself through creating and writing, and I love sharing both with you

If I may, I'd love to invite you to follow my blog.
There is a "follow" button up a bit and to the right. --->
Not the follow by email, it's up just a bit from it. Thank you so much!
It brings me so much joy sharing my thoughts and creations with all of you!

(Unfortunately, you won't have access to the follow button from your phone.)

As always~

Thanks for spending time with me today!

Until next time~

Be blessed, friends!

Bobbie Sue
 
Forgive any grammar mistakes you may find. However, I am always open to friendly and constructive criticism or correction. Please know, I write my blog out of absolute enjoyment and do not stress over possible minor errors within the layout. I appreciate you, friends.

Wednesday, April 24, 2019

GIU Day 3 ~ He is

Hello again, friends!
 
Welcome to day 3 of my Growing in Unity week with Unity Stamp Company.
 
 
Today I want to share a set of beautiful purple flowers. I used the flower stamp from Angie Bloms set "My Condolences". This was my first time inking up this flower and I must say; it is an absolute dream to color!
  
This first card was made for my daughter Samantha. She loves the color purple. There is a most precious significance behind using the words He is. You ready for it? :)
 
When my kids were little we had a well loved CD compilation that we would listen to over and over. One of their favorite songs was "He is" by Aaron Jeoffrey. (I've linked the song here ;) They still talk about that CD to this day. My daughter and I listen to this song together (and a few others from that CD) when I visit her in Kansas City. It holds a very special place in our hearts and making this card brought back the sweetest memories.
 
The sentiment "He is" is from Graciellie Design set called Hallelujah. I masked off risen so that I could use only the He is portion of the stamp. I encourage you to not put away stamp sets you may only use for a special occasion because many of the sentiments can be masked off and used for any occasion.


 I love this next card just as much as the first.  I made this for my sister, Tina. She is one of my very closest friends and I could NOT do life without her. This flower stamp is so incredibly versatile. It is large enough that you can use pieces of it to achieve an incredible design.
 
Here is how I created the card below:
  • I placed the stamp where I wanted it onto my watercolor panel. After stamping the first corner, I left the stamp in place on my stamping platform and simply turned the paper around to stamp the mirrored image to the adjacent corner. I left the stamp in place to re-stamp after my watercolored images dried.
  • I then stamped my sentiment from the March 2019Sentiment Kit called ...baby bear hugs. I took my white roller pen and added some white markings to the word Friend.
  • This was the first time I used a new to me set of watercolors, and I absolutely love them. They are a 48 pan set by I Dainayw. Very high quality and highly concentrated. The pigment is vibrant and beautiful!
  • After I finished coloring, I took the panel back to my stamping platform and re-stamped the flowers so that I could heat emboss them.
  • Lastly I attached the completed panel with foam tape to an A2 horizontal card base and added a few black enamel dots.
 
I am eager to color this flower set again and again and...…. 


As always, I would love to know which card was your favorite!
 
I do have several items linked, but I am not an affiliate. I just like to enable you as best I can. ;)
Be sure to visit me each day this week for new creations and virtual hugs. By commenting on my blog EACH day you will have a chance to win some pretty amazing stamps from Unity Stamp Co.
 
I will also be offering a thank you gift for visiting and commenting on my blog and FB post each day!
 
If you are here visiting me from Instagram I've a special thank you gift for one of you for commenting on my blog and IG post each day!
 
For those of you who fully read my blog, thank you so very much. I love being able to express myself through creating and writing, and I love sharing both with you

If I may, I'd love to invite you to follow my blog.
There is a "follow" button up a bit and to the right. --->
Not the follow by email, it's up just a bit from it. Thank you so much!
It brings me so much joy sharing my thoughts and creations with all of you!

(Unfortunately, you won't have access to the follow button from your phone.)

As always~

Thanks for spending time with me today!

Until next time~

Be blessed, friends!

Bobbie Sue
 
Forgive any grammar mistakes you may find. However, I am always open to friendly and constructive criticism or correction. Please know, I write my blog out of absolute enjoyment and do not stress over possible minor errors within the layout. I appreciate you, friends.


Tuesday, April 23, 2019

GIU Day 2 ~ In & Out


Hello, friends! Welcome to day 2 of my GIU week!
 
I had so much fun with todays creation and was happy to revisit the eclipse technique I used to love doing. 
 
This first card uses the traditional (3d) eclipse technique. Which is simply a layered die cut cut out of a prepared image, and popped up through the negative. You can use any die or punch to make an eclipse card. It doesn't have to be a word or letters. You can even use a stamp cut out with your Scan & Cut to make an eclipse card. Like I've done on the second card. They are so easy and fun to create!
 
The young girl in me so wants Julie Girls outfit and spunky attitude! ;) I love her. She is perfect for my preteen nieces. Especially my precious Eva!

(Typically you would leave out the inside pieces of the word, but in this case I chose to use them.)
 
 
Here is how I created this card:
  • I stamped Julie Girl on a piece of Bristol smooth with VersaFine in Pinecone and colored her with Zig Kuretake Real Brush Pens. (can you tell they've become my favorite;)
  • Next I used the happy die from Hero Arts Happy Stamp and Cut set.  (I would have linked for you here, but it is currently unavailable.) I used my Gemini to first cut directly on her and then 6 more times through color coordinated cardstock to stack with.
  • After having happy cut from my panel I placed the birthday sentiment. I used the happy birthday stamp from the August 2018 Sentiment kit called " ...there is no reason", but only stamped the word birthday.
  • The next thing I did was attach my colorful background paper to an A2 card and attached Julie Girls panel centered directly to it.
  • I glued all the happy cuts together to form my pop up and then glued in place on the panel.
  • Lastly I added the enamel dots and washi.
 
I absolutely adore this card and can imagine Eva exclaiming "Eeeeek!" when she receives it!
 
********************************************
   
 Llama tell you something! This adorable guy from Angie Bloms "Llama tell ya something" was stubborn. (Lets call him Bernard)  He was determined to not allow me to use him, but after a little coaxing, I finally won him over. You'll notice in the details of making his card how I had to be creative with his unsightly forehead and the dire need to slightly add to his neck in order to use him. Tell me he isn't a cutie!!
 
 
Here are the details in making this card:
 
  • I placed all 3 stamps on a piece of sturdy white cardstock, deciding how I wanted them to stamp. (you can see in a photo below how I did this) After getting the hat and bow tie exactly where I THOUGHT they should go I stamped them down and cut them out using my Scan & Cut.
  • I left my machines settings exactly where they were so I could have it fussy cut several more hats and bow ties in coordinating cardstock for me to stack.
  • I took the original white paper back to my Misti to stamp the Llama in between the hat and bow tie. You'll notice in the photo below that I misjudged the space and had to add to the neck area to lengthen it. I did this by getting the stamp exactly where it would need to be and then ONLY adding ink to the area of the stamp I needed. It worked!
  • However, I got ink on his forehead in the process. Oy! No worries, though! If you'll notice, I turned it into a cute tuft of hair.  It worked out perfectly and set him apart from his friends by giving him even more character! Since I chose to not color Bernard, I also added a few bits of hair here and there with a black pen.
  • I then attached a colorful piece of DSP to an A6 card base, and attached Bernard.
  •  I glued all my hat and bow tie pieces together and glued them in place.
  • Lastly, I added my sentiment and the enamel dots.
 
See here I shorted his neck space and got ink on his forehead! So glad I was able to save it!


This is the inside of the Llama card. This sentiment seems perfect for the inside of the card!

 
 I rarely make fun cards and I am not sure why. These were so fun to make!


I would love to know which card was your favorite! Would love to see your version of an eclipse card!
Be sure to visit me each day this week for new creations and virtual hugs. By commenting on my blog EACH day you will have a chance to win some pretty amazing stamps from Unity Stamp Co.
 
I will also be offering a thank you gift for visiting and commenting on my blog and FB post each day!
 
If you are here visiting me from Instagram I've a special thank you gift for one of you for commenting on my blog and IG post each day!
 
For those of you who fully read my blog, thank you so very much. I love being able to express myself through creating and writing, and I love sharing both with you

If I may, I'd love to invite you to follow my blog.
There is a "follow" button up a bit and to the right. --->
Not the follow by email, it's up just a bit from it. Thank you so much!
It brings me so much joy sharing my thoughts and creations with all of you!

(Unfortunately, you won't have access to the follow button from your phone.)

As always~

Thanks for spending time with me today!

Until next time~

Be blessed, friends!

Bobbie Sue
 
Forgive any grammar mistakes you may find. However, I am always open to friendly and constructive criticism or correction. Please know, I write my blog out of absolute enjoyment and do not stress over possible minor errors within the layout. I appreciate you, friends

Monday, April 22, 2019

GIU Day 1 ~ Bold Simplicity

Hello, friends! Happy Monday!
 
Welcome to my Growing in Unity (GIU) day 1. This is my second year to join all of you as a GIU sister, and I have been eager for months for this week to get here!
 
Todays cards were kept fairly clean and simple (CAS). I started the week using one of my all time favorite stamps from the set Difficult Roads, by Graciellie Designs. I made 3 different cards using the same stamp from this set. I was so excited that I had a faux cotton bunch to use in my photos!
 
I needed a few "just because" cards to keep in my stash and I just love how this first one turned out. I  used two different sentiment stamps from the July 2018 Sentiment kit called "...let your wishes fly". The butterfly is from "Always by your side".
 
 
Details on creating this card:
 
  • I stamped on Bristol Smooth with Versa Fine ink in Pinecone. This is my absolute favorite ink and color to stamp in! I've linked it here for you from Unity Stamp Co. 
  • If you look closely you can see that the cotton is colored white. I used a uni-ball Signo brand white gel pen, and colored the boll with a light brown Zig marker. 
  • I stamped the butterfly on vellum and fussy cut. It is bent where the wings meet the body so that it would appear to be settling onto the cotton. I love the effect the double wing has. As a matter of fact, I bought this set just for the butterfly!
  • I trimmed the edges just enough to see the A2 base I popped it up on.

******************************************* 

 
This next card speaks to my heart and I pray the recipient feels the same. The card itself is very clean and simple, but the sentiment so powerful.
 
The cotton was colored with a purple Zig and then spread out using a Wink of Stella pen. I wish you could see the beautiful shimmer it gave! This sentiment is from a Graciellie Design set aptly named "My soul finds rest".
 
If you find your soul needing rest today; I pray that you lean into His arms knowing that is where true rest is found...


I am loving the orange in this next card! I colored the cotton the same as I did the card above and wish you could see the gorgeous shimmer on this card! The sentiment is from the amazing "she" set by Donna Downey. I have used sentiments from this set time and time again. It is a must have.
 
This card is for my daughter Samantha, to remind her the promises she has made to herself to work hard towards "living the life she has always imagined... She's getting there, and I am so proud of her.
 
I stamped the sentiment in Versa Fine Black onto vellum and heat set with clear embossing powder. The vellum strip is wrapped around the panel and secured to the back with masking tape.
 
I attached the panel to an A2 piece of beautiful orange heavy cardstock with an amazing canvas texture! I bought the 18 sheet set from Tuesday Morning, but I've not been able to find it again. I know you are only seeing a small portion of it on this card, but it truly is wonderful paper to have in your collection. It is the My Colors set from My Minds Eye. You can purchase these per color single sheet at Scrapbook.com

 
Tomorrow I am using a technique that I've not used in too long, as well as a new one I just discovered!
 
I would love to know which card was your favorite!
 
Be sure to visit me each day this week for new creations and virtual hugs. By commenting on my blog EACH day you will have a chance to win some pretty amazing stamps from Unity Stamp Co.
 
I will also be offering a thank you gift for visiting and commenting on my blog and FB post each day!
 
If you are here visiting me from Instagram I've a special thank you gift for one of you for commenting on my blog and IG post each day!
 
For those of you who fully read my blog, thank you so very much. I love being able to express myself through creating and writing, and I love sharing both with you

If I may, I'd love to invite you to follow my blog.
There is a "follow" button up a bit and to the right. --->
Not the follow by email, it's up just a bit from it. Thank you so much!
It brings me so much joy sharing my thoughts and creations with all of you!

(Unfortunately, you won't have access to the follow button from your phone.)

As always~

Thanks for spending time with me today!

Until next time~

Be blessed, friends!

Bobbie Sue
 
Forgive any grammar mistakes you may find. However, I am always open to friendly and constructive criticism or correction. Please know, I write my blog out of absolute enjoyment and do not stress over possible minor errors within the layout. I appreciate you, friends!


Thursday, April 18, 2019

Rainbow Color Challenge!


Hello, friends!
It's Thursday, and I am back again as a guest designer with Unity Stamp Co. I am so excited to bring you another mini challenge. Have you noticed how popular rainbows are in the paper-crafting community?! This gave me a great idea to have a mini challenge all about color using rainbow techniques!
 
I had the most fun creating the 3 cards I am sharing with you today!
 
The design of this first card was inspired by one I seen on Instagram. I have always loved the striped watercolor look. How gorgeous are these colors!
 
 
Here are the steps I took in creating this card:
  1. First, using the flat brush you see in the photo, I applied a light water only wash to the area I wanted to lay down color.
  2. Next, I generously applied my chosen color to the wet area only. (My colors are from the Altenew watercolor pallet that I use quite frequently.) Taking care to push the color around to settle unevenly. Uneven lines are so much prettier than straight lines! ;) Notice how color heavily settles to the bottom of each stroke? I love the look this gives!
  3. After completely drying the color with my heat tool, I spattered a champagne gold color using a thick round watercolor brush. Once this color dried completely I then spattered the black. Who else is obsessed with spatter on cards/tags?!
  4. After all the color dried, I stamped the sentiment from a Jolande van Oosterhout set called a good life and the butterfly from Always by your side .
  5. I trimmed the sides just a bit smaller than my card base (verticle A2) and popped up the panel using foam tape.
 
 
This next card was created by doing a simple gradient color wash on watercolor paper. For such a quick and fairly simple technique, it has a truly elegant look.
 
 
This last card is my absolute favorite! I love how colorful and fun it is! Both sentiment and images are from a Graciellie Design set called Colorful Day. Below I will share a brief photo tutorial showing the steps taken to create the faux spatter.


Here are the steps I took in creating the spattered look:
 
 I used my Scan n Cut to fussy cut several paintbrushes I can use as masks. In this photo, you see that I am stamping the spatters onto scrap paper insuring this is were I want them applied . I'm loving this "faux" spatter stamp.


Next, I took turns masking the brushes and stamping the spatter in coordinating color.


The process may seem a bit tedious, but look at the beautiful result. Such a fun technique!


Something about color makes me smile and I guarantee you will find such joy in creating for this challenge.
 
Don't forget to challenge yourself!
 
 
This challenge is posted on the Unity Blog and will run through next Thursday. Remember, the napkin challenge is still running through the end of this month! If you have any questions regarding any of the challenges, please know, you are always welcome to reach out to me.
 
Unity is making your participation even more rewarding by offering a prize for each challenge! Each week you have a chance to win some fantastic Unity stamps!
 
By participating in the month long challenges AND tagging me in your post, you have a chance to win a $25 gift card to Unity Stamp Co!
 
Have fun creating!
 
I'll be with Unity again next Thursday, and invite you to join me as we use our favorite Unity stamps to create a card that will touch the heart of one closest to you.
 
Until then, friends~
 
Be blessed,
 
Bobbie Sue


Tuesday, April 16, 2019

Digis with Polka Dot Orchard

Good Morning, friends! Happy Tuesday!
 
I couldn't wait to share todays card with you.  Just look at this incredibly beautiful hummingbird from Polka Dot Orchard. One of the best things I could have done for my cardmaking/paper-crafting career was learning how to work with digital images. I am still learning!
 
Both the image and the design are from the digi set called Spread Your Wings. I can not encourage you enough to add this set to your digital image collections. All of the digital/printable images from PDO are such high crisp quality.
 
This card was an absolute joy to color. So many images allows such creativity! As I am writing this I notice that my sentiment is not centered. Ha. You know what. I am not at all bothered by it. I love it so much. Imperfections bring character. And character, beauty.  I'll just pay closer attention to the next one. ;)
 
 
 I colored the hummingbirds with Zig Kuretake real color brush pens. I finally mastered how to use them without water a couple weeks ago and I've been coloring like crazy! So much joy it brings! The only thing I used water on was the shadow underneath the birds. I needed it to fade out more than my lightest grey would allow.
 
Did you know?? You can print on vellum and heat emboss while the ink is still wet!
I discovered this a few moths ago and it is a game changer when working with digis! Do you see the beautiful gold splatters? Splatters, of all colors, add the perfect element to such a large and open background.
 
 
Details on how I created this card:
 
  • After multiplying and resizing the image, (with help from a dear friend) I printed this layout onto Bristol Smooth. (It is the very best paper for using your Zigs on as it doesn't absorb right away and it is incredibly smooth.)
  • I colored/blended these using Zigs. Once dry, I splattered gold watercolor ink using #903 from Kuretake Gansai Tambi
  • I printed the sentiment on vellum from PTI. In my opinion it is the very best vellum for printing on. As soon as it printed I heat embossed in clear gloss embossing powder from WOW. I trimmed to desired size and wrapped it around my finished panel. I almost always wrap my vellum and attach to the back with an inexpensive scotch tape . This avoids the use of  need to use an adhesive on the front of the card.
  • Next, I popped up the panel with a foam adhesive to a vertical A2 card base.
  • Finally, I attached my card insert that I will write my message on. I always add a folded insert to my cards. I love the finishing touch it brings to the overall feel of the card.
 
I do believe this is one of my absolute favorite cards. It is pretty clean and simple, yet has so much eye catching detail.
 
I hope you enjoy these creations as much as I enjoyed creating them!
 
The added links are NOT affiliates. I just like to enable you by giving you easy access. ;)
 
If I may, I'd love to invite you to follow my blog.
There is a "follow" button up a bit and to the right. --->
Not the follow by email, it's up just a bit from it. Thank you so much!
It brings me so much joy sharing my thoughts and creations with all of you!

(Unfortunately, I don't think you will have access to the follow button from your phone. Please, correct me if I am mistaken.)

As always~

Thanks for spending time with me today!

Until next time~

Be blessed, friends!

Bobbie Sue
 
Forgive any grammar mistakes you may find. However, I am always open to friendly and constructive criticism or correction. Please know, I write my blog out of absolute enjoyment and do not stress over possible minor errors within. I appreciate you, friends!
 

Saturday, April 13, 2019

Cuddlebug masking

Happy Saturday, Friends!
 
I wanted to share with you my steps in creating this group of furry friends using Artist Tierra Jackson's Cuddlebug line of stamps at Unity Stamp Co.
 
I knew I wanted to create a large piece that could be framed or mounted. Once I decided which of the Cuddlebug stamps I wanted to use, my next step was to choose how I wanted to lay them out.
 
 
I stamped the images onto an inexpensive piece of cardstock to use as masks and let my Scan & Cut do the fussy cutting for me. The only 2 that didn't cut quite right were the porcupine and the moose. But having my S&C cut the other 8 cut for me saved me so much time and energy!


Then I went about stamping and masking. You'll see in the next several photos how I turned my paper in all different directions in order to place the stamps where I wanted them. I so appreciate the size and stampability of the Tim Holtz Stamping Platform.


When I was first introduced to masking stamped images I didn't think I would ever get the concept. After much trial and error I discovered that it wasn't near as hard as I thought, and what an essential technique this is!


 I imagine it will take a few days to color and then another day to decide on the sentiment, and work on the background. Of course my biggest fear is that I will somehow mess up in a way that can not be disguised. Haha, no, I am feeling quite confident that I will be happy with the result!
 
I can't get over how adorable these little critters are! My maiden name is Ritter. When I was growing up with my 3 brothers and 2 sisters we were known as "The Ritter Critters". Haha we absolutely loved it!
 
I wished that I would have placed the front row closer together so there wouldn't be so much space between them. When I showed this to my husband and shared with him my disappointment in the space he said, "maybe they don't like each other".  I told him they actually love one another! He then said, "there must be so much love between them then". I pretty much melted and told him I was going to share this in my blog!
 
 
When I am coloring with Zigs on Bristol smooth I always place my hand on a paper towel. Zigs on this specific paper is very wet and this prevents me from smearing ink that may not be dry. I also swipe the tip of my marker onto the paper towel after I have blended with it so as to "clean it".
 
I keep a small sheet of what ever paper I am working with to make sure I am happy with the color and to see how well it blends with other colors. Mediums lay differently on different types of paper.
 
The paint brush is for picking up color that I mistakenly get outside of the lines. I use the blending brush in areas I may not be able to blend with my Zigs.
 
 
Based on the 2 colors I set out on my napkin, what do you think I am going to color first? The first person to get it right will get a small prize package from me. Can't wait to see what you think it is?
 
I am so excited to complete this project and show you the finished piece!
 
*****************************
 

For those of you who fully read my blog, I thank you so very much. I love being able to express myself through creating and writing, and I love sharing both with you. 

If I may, I'd love to invite you to follow my blog.
There is a "follow" button up a bit and to the right. --->
Not the follow by email, it's up just a bit from it. Thank you so much!
It brings me so much joy sharing my thoughts and creations with all of you!

(Unfortunately, you won't have access to the follow button from your phone unless you view as web version. ;)

As always~

Thanks for spending time with me today!

Until next time~
 

Be blessed, friends!
 
Bobbie Sue